Halloween House Village
| This post may contain affiliate links, which means I may receive a small commission, at no cost to you, if you make a purchase through a link. |
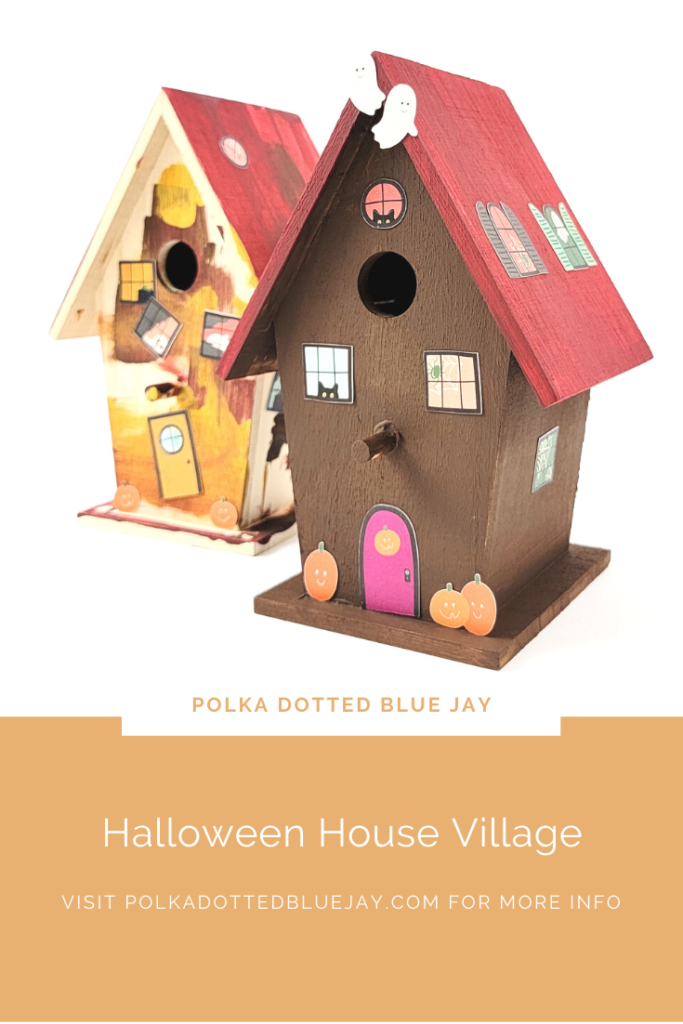
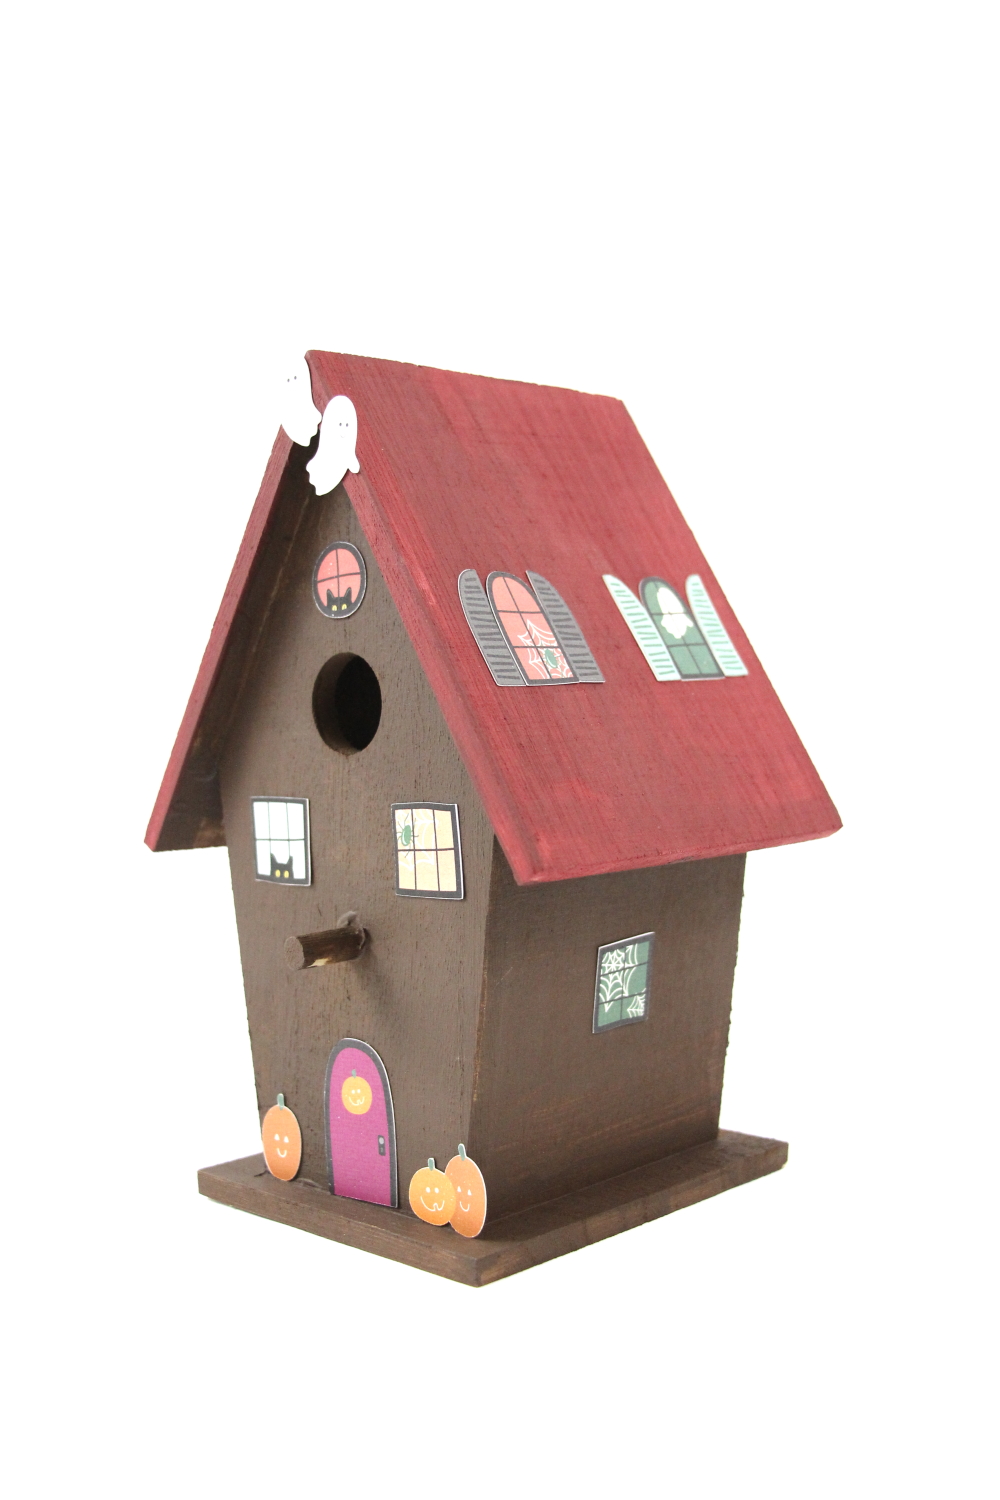
I had so much fun making a Halloween House Village with Jed this past week. We painted and decorated our Halloween House Village in one afternoon; such a great time of bonding and crafting with my boy.
I’ve shared before about how AMAZING my grandparents were and how I owe a huge chunk of creativity to them. At one point in the early 90s, my Grandpa would make custom birdhouses and my Gram would paint them. They sold them at craft fairs and in booths – the OG Etsy site! Apparently, I owe a lot of my entrepreneur tendencies to them too!
Don’t forget to share your fall crafts this week with #DIYitsFallOhMy to enter to win a prize for yourself!
Estimated Time: 20-30 Minutes
Skill Level: Intermediate
Supplies Needed:
- Silhouette CAMEO® 4
- Cutting Mat – Light Tack
- Amy Robison Print and Cut Halloween Designs
- White Cardstock
- Color Printer
- DecoArt Fall Paints
- Foam brush
- Birdhouse (similar one here)
Step One: Paint Your Halloween House
Put a little of your DecoArt paint on a palette or a paper plate.
Dab your foam brush in the paint and apply it to your birdhouse.
Allow your Halloween House plenty of time to try before you move on to the decorating step. We painted ours in the morning and then decorated it after naptime.
Step Two: Print Your Halloween House Decorations in Silhouette Studio:
Open Silhouette Studio® on your computer.
Select the Page Setup Window and adjust your cutting mat size to 12×12 (or the size paper/mat you are using). I use a 12×12 mat but print on letter-sized cardstock so I select “letter” from the drop-down menu.
Add registration marks to your page by clicking the icon with three corners on the page set-up.
Purchase your Party Pack from Amy Robison and then open your design in Silhouette Studio. Click File>Library>Library>Recent Downloads>Select the Halloween design.
Re-size to the size you would like your decorations to be (you may have to shrink them a little depending on the size of your birdhouse). Be sure your design fits within the registration marks.
Load your cardstock in your home printer. You can also use sticker paper to make decorating your Halloween House even easier.
Send your design to print within the Silhouette Software.
Remove from your printer
Step Three: Cut Your Halloween House Designs in Silhouette Studio:
Turn on your Silhouette CAMEO® 4.
Attach your cardstock to the cutting mat and load it into your machine by lining up your mat with the guidelines and pressing the “up” arrow.
Next, click “send” in the Design Studio and then select the type of cardstock you are using from the dropdown menu.
Double-check to make sure your design has been selected to cut and the Silhouette CAMEO®4 autoblade had been selected. The autoblade will adjust to cut based on the type of material you selected above.
Make sure you select “cut by line”.
Click “Send” to start cutting. The machine will automatically detect the registration marks and cut out your design.
Press the “down” arrow when your machine has finished cutting your design to remove the cutting mat from the machine.

Step Four: Finish Your Halloween House Village:
Remove your cardstock from the cutting mat.
Gently remove the designs from the cutting mat and attach to your house with double-sided tape.
I love letting Jed decorate on his own. The windows may be crooked but I love allowing him to express his creativity in his own special way. He loved the little windows with the spider webs and we had a great time together.
I can’t wait to see your Halloween House Village too!